Sign up for exclusive offers, events and more.

Premium Oak and Pine Bed Wood Kits for Chevy and Ford Classic Trucks

Made in the U.S.A


Bed Wood Kits for Classic Chevy & Ford Trucks


Trusted by enthusiasts for over a decade of expert service, unmatched quality, and parts you can count on.
We're passionate about classic trucks and proud to help you restore yours with precision cut bed wood and exceptional support every step of the way.
We’d be honored to earn your trust and show you why so many customers consider us the best in the industry.

Bed Wood Install Instructions

Installing a new wood floor in a classic truck bed is a rewarding project that significantly enhances the vehicle's appearance and value. Below is a step-by-step guide on the installation process.

Materials and Tools Needed

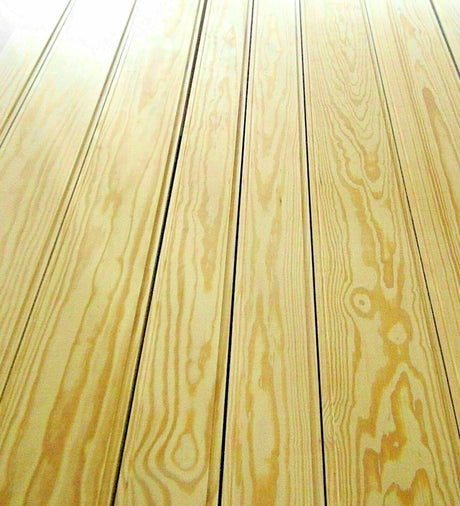
  • Wood Plank Kit: Pre-cut and grooved (typically Oak, Pine, or Ash).
  • Bed Strips: Polished stainless steel or painted steel.
  • Hardware Kit: Bolts, washers, nuts, and specialized "carriage" bolts for the strips.
  • Bed Wood Finish: Marine-grade spar varnish or polyurethane.
  • Tools: Socket set, drill, tape measure, clamps, and a rubber mallet.

Step 1: Preparation and Finishing

Before installation, ensure your bed frame is clean, rust-free, and painted. It is highly recommended to seal and finish all sides of the wood planks (including the ends and inside the grooves) before they go into the truck. This prevents moisture from warping the wood later.

Step 2: Laying Out the Planks

Lay the wood planks into the bed frame to check for fit. Most kits have specific boards for the far left and far right sides (often wider or with unique notches).

Tip: Do not bolt anything down yet. Space them out evenly, leaving a small gap (usually 1/8 inch) between the boards for expansion.

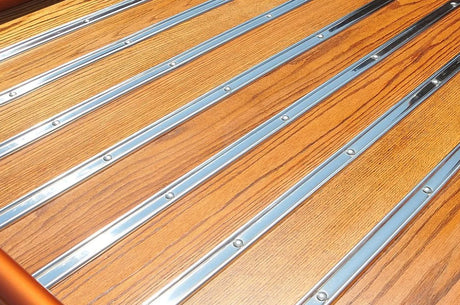
Step 3: Aligning the Bed Strips

Place the metal bed strips into the grooves of the wood. These strips hold the wood down and cover the gaps. Align the holes in the strips with the cross-members of the truck frame.

Step 4: Drilling and Hardware Insertion

Once everything is aligned, insert your bed bolts through the strips and wood.

If your bed frame is new or custom, you may need to drill holes through the wood using the strips as a template.

Drop the bolts through the strips, through the wood, and finally through the truck's cross-members.

Step 5: Securing the Floor

From underneath the truck, install the washers and nuts.

Crucial Tip: Start all nuts by hand first. Do not tighten them fully until every single bolt is in place. This allows you to "square" the bed and make minor adjustments.

Once aligned, tighten them from the center outward to ensure the floor lays flat.

Check Tightness: After the first few drives, crawl under the truck and re-tighten the nuts, as the wood may settle.

UV Protection: If the truck is stored outside, suggest a bed cover or a wax with UV protectants to keep the wood from fading.

Drainage: Ensure the bed's drainage holes are clear so water doesn't pool on the new wood.

Classic Chevy & Ford Truck Bed Wood Staining & Finishing Tutorial

If you’re restoring a classic Chevy or Ford pickup truck, the bed wood finish can completely change the appearance of the truck. I’ve restored a lot of truck beds over the years, and one of the biggest questions people ask is:

“Should I use stain, oil, polyurethane, spar varnish, or leave the wood natural?”

Here’s a complete guide for finishing Red Oak and Pine bed wood for classic trucks.

Choosing the Right Wood

Red Oak Bed Wood

Red Oak is one of the most popular choices for show trucks and custom builds.

Why people use Red Oak:

  • Deep grain pattern
  • Takes stain evenly
  • Harder and more durable
  • Premium high-end appearance
  • Great for dark stains

Best stain colors for Red Oak:

  • Dark Walnut
  • Golden Oak
  • Early American
  • Red Mahogany
  • Sedona Red

Best finish options for Oak:

  • Oil-based polyurethane
  • Marine spar varnish
  • Boiled linseed oil
  • Tung oil

Oak looks incredible with multiple coats of polyurethane because the grain really pops.

Pine Bed Wood

Pine is closer to what many original Chevy and Ford trucks used from the factory.

Why people use Pine:

  • More affordable
  • Factory-correct appearance
  • Lightweight
  • Rustic vintage look

Important:

Pine absorbs stain unevenly, so always use:

  • Wood conditioner before staining

Best finishes for Pine:

  • Boiled linseed oil
  • Clear satin polyurethane
  • Spar urethane
  • Natural oil finish

Many restorers leave Pine lighter in color for an authentic vintage truck appearance.

Step-by-Step Bed Wood Finishing Process

Step 1 – Sand the Wood

Start sanding with:

  • 100 grit
  • Then 150 grit
  • Finish with 220 grit

Always sand WITH the grain.

Do not skip final sanding or the stain may look blotchy.

Step 2 – Clean the Wood

Use:

  • Tack cloth
  • Air compressor
  • Clean microfiber towel

Dust left in the grain ruins the finish.

Step 3 – Apply Wood Conditioner (Especially Pine)

This helps prevent uneven stain absorption.

Wait about:

  • 15–30 minutes before staining

Step 4 – Apply Stain

For Oak:

Apply with:

  • Foam brush
  • Lint-free cloth

Let stain soak:

  • 5–15 minutes

Wipe off excess.

Oak Tip:

Two light coats usually look better than one heavy coat.

For Pine:

Use lighter coats because Pine absorbs stain quickly.

Best results usually come from:

  • Golden Oak
  • Early American
  • Natural finishes

Step 5 – Seal the Wood

This is where many restorations fail.

Truck beds see:

  • Sun
  • Moisture
  • Temperature changes

You MUST seal all sides of the wood including:

  • Bottom side
  • Ends
  • Bolt holes

Best Finish Options

1. Oil-Based Polyurethane

Best for:

  • Show trucks
  • Gloss finish
  • Deep grain appearance

Pros:

  • Durable
  • Glossy
  • Easy to clean

Cons:

  • Can yellow slightly over time

Recommended:

  • 3–5 coats

2. Marine Spar Varnish

Best for:

  • Outdoor trucks
  • Drivers
  • Humid climates

Pros:

  • Flexible
  • UV resistant
  • Water resistant

Cons:

  • Longer dry times

This is one of the best choices for trucks that actually get driven.

3. Boiled Linseed Oil

Best for:

  • Vintage factory appearance
  • Rustic restorations

Pros:

  • Easy to apply
  • Traditional finish
  • Natural look

Cons:

  • Requires maintenance
  • Less water protection

Many old-school restorers still swear by linseed oil.

4. Tung Oil

Best for:

  • Natural satin appearance
  • Highlighting grain

Pros:

  • Deep penetration
  • Natural finish

Cons:

  • Multiple coats required

Pro Tips

Seal EVERYTHING

Most people only finish the top side.

Wrong.

Seal:

  • Top
  • Bottom
  • Ends
  • Inside bolt holes

Moisture enters unfinished areas first.

Let the Wood Cure

Before installation:

  • Let finish cure several days

This prevents fingerprints and hardware marks.

Stainless Hardware Matters

Cheap hardware ruins beautiful wood.

Use:

  • Stainless bed strips
  • Stainless bolts

Final Thoughts

For show trucks:

  • Red Oak + Dark Walnut + Polyurethane = amazing results

For factory-style restorations:

  • Pine + Linseed Oil or Satin Finish = classic look

A properly finished bed wood kit can completely transform a Chevy or Ford pickup.

CStreetSupply

America's #1 Choice for Classic Truck Bed Wood